Workflows provide a flexible and controllable way of content creation, maintenance, and review. Sitecore's workflow facilities make it possible to quickly define sophisticated workflows, often without writing any code at all.
This article assumes that the reader is familiar with the Sitecore's default "Simple" workflow and wants to understand its configuration.
1. The Simple Workflow
Workflows are defined in the System section of the Content Editor – select ‘System’ in the Content Editor treecrumb and scroll down to the ‘Workflows’ node in the tree on the left hand side of the editor. This is where the Sitecore Simple workflow is configured – expand all nodes to have a better view. You should see the following structure:
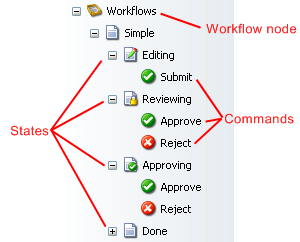
1.1. Workflow Node
Each workflow is defined by the node based on the System / Workflow / Workflow template. You can have as many workflows as you like. To add a new workflow, you only have to add a workflow node and populate its children.
The workflow node has only one meaningful field named ‘Initial State’. It controls the default state in which all Items will be created. In simple workflow, the initial state is set to Editing. We’ll describe the workflow states in more detail in the next section.
1.2. Workflow States
States are the building blocks of the workflow. They define steps the document may pass through before being published. State nodes are based on the System / Workflow / State template and are added as children to the workflow node. The State template has only one checkbox field named ‘Final’. When the ‘Final’ checkbox is checked, Items in this state are considered to be complete and ready for publishing. Items can only be published when in the final state.
The Simple workflow contains four states. Three of them: Editing, Reviewing and Approving define the document flow prior to publishing. The last state, Done, indicates that the document is ready to be published. Therefore “Done” is the only state marked as ‘Final’.
The order in which states are displayed in the Content Editor does not influence the flow of an Item in the workflow. The flow itself is defined only by the workflow commands.
1.3. Workflow Commands
The commands are used to move an Item from one state to another. You can think of them as links between states. Command nodes are based on the System / Workflow / Command template which has a ‘Next State’ field.
Adding commands as children to the state node defines commands that can be executed on an Item in a given state. When the command is executed, the Item moves to the state defined as the state in the ‘Next State’ field.
Let’s look at the Approve command of the Reviewing state:
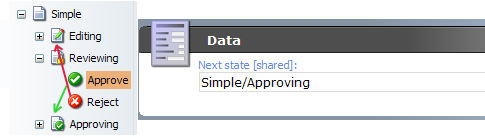
You can see that it has ‘Next state’ set to ‘Simple/Approving’, that is the Approving state of the Simple workflow. Contrary to this, the Reject command has ‘Simple/Editing’ as its next state.
What does this all mean? When a document is in the Reviewing state, the User with appropriate security rights will be able to perform two workflow commands: Approve and Reject. Approve will send the Item forward to the next state, and the Reject will send the Item back to the Editing state.
1.4. Binding the Item
Most Users cannot choose which workflow an Item will have when creating or editing the Item. The Workflow associated with the Item is predefined in the Template or Master associated with the Item. For example, let’s take a look at the “Document with workflow” master, its Workflow section in particular:
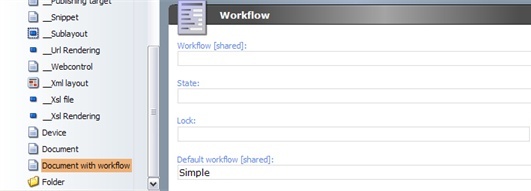
You can see that the ‘Default workflow’ field is set to Simple. This means that all Items created from the “Document with workflow” master will be created in the Simple Workflow’s Default State.
1.5. Workflow Section Fields
Every Item in Sitecore can be in the Workflow state. You can display the Workflow section for a selected Item by choosing 'Workflow' from the bulleted list on the right panel and make all necessary changes if needed. Of course, you need to have enough security privileges to make changes to this section. Normally, you won't need to adjust anything here - manual edit is supported for special cases only.
The Workflow section consists of four fields. Below is their brief description.
Workflow – the current Item’s workflow. Blank if the Item is not currently in a workflow. This field should be blank in Templates and Masters. Sitecore automatically sets this field based on the Default Workflow (see below) and the Workflow commands that the User selects.
State – the current Item’s workflow state. Blank if the Item is not currently in a workflow. This field should be blank in Templates and Masters. Sitecore automatically sets this field based on the Default Workflow (see below) and the Workflow commands that the User selects.
Lock – indicates whether the current Item is locked (checked out or in) and by whom. Sitecore automatically sets this field.
Default Workflow – the workflow that the Item enters when created or edited. If blank on an Item, Sitecore will use the value in the Item's Template. If blank on the Template, the Item will not be placed in a workflow.
2. The Workflow in Action
Now we’ll switch to the User’s point of view and see how it all works in practice. The example below was run on a fairly clean Sitecore installation by a User with Administration rights.
2.1. Creating an Item
Open the Content Editor and create a new Item using the “Document with workflow” master. The Item is created as usual. Notice the ‘Submit’ button on the toolbar:

As you can see from the bulleted list on the left side of the Toolbar, the Item is in the ‘Editing’ state of the ‘Simple’ workflow. The logic behind this is simple: The “Document with workflow” master has Simple workflow set as its default workflow, and Simple workflow in its turn has the ‘Editing’ state set as its initial state.
You can try to publish the document using any type of publishing: publish Item, incremental or full, but the Item will not appear on the published web site. This is because the Item is in the ‘Editing’ state and this state does not have the ‘Final’ checkbox checked. This means that an Item will never be published while it is in this state.
2.2. Executing Commands
In addition to check-in / check-out options, now you can also execute workflow commands from the Content Editor (please see the Workflow Commands section). Move the Item to the next state by clicking the ‘Submit’ button.
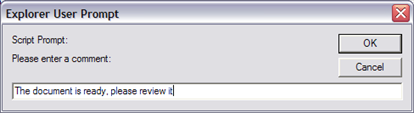
The comment is stored along with the Item’s workflow history which records all the states and transitions the Item passes through. Fill in the comment and click OK.
We’ve successfully moved the Item to the ‘Reviewing’ state by executing the ‘Submit’ command. Now a different group of Users is responsible for handling it and passing it to the next state or rejecting back to the previous state. But since the current User is a mighty administrator, we can see the Item in any state. Please refer to the Workflow Security article for more information.
You can also use the "Workbox" application to see the state of every Item that is in any workflow (of course, only if you have enough privileges to see the Items). Please refer to the User Manual for more information about using the Workbox application.
2.3. The Final State
Let’s move to the final step. Using the workflow commands, move the Item through all the states up to the ‘Done’ state. Try publishing it again and the Item will be accessible from a browser.
When in the final state, the Item can no longer be modified. If an editor wants to make some corrections, he presses the ‘Edit’ button on the toolbar, which creates a new version of the Item, places it in the Editing state, and the whole process starts again.
3. Summary
In this article we have covered the basic workflow principles, such as the workflows themselves, workflow states and workflow commands. Using the Simple workflow, which is included in Sitecore V5 as an example, we’ve learned how to put them together to achieve the desired result.
Feel free to experiment with the Simple workflow. You can remove states, create ‘shortcut’ commands that will make items jump over states, and so on.