Using Azure SQL with Commerce Server
Using Azure SQL with Commerce Server.
Commerce Server can use on-premise SQL Server or Azure SQL for its back end datastore. The experience for deploying to Azure SQL is similar to working with on-premise SQL Server, but the Azure SQL version comes with some additional considerations.
Things to be aware of with Azure SQL support:
Only v12 of Azure SQL is supported.
The MSCS_CatalogScratch database no longer exist. All of its tables are now created in the appropriate *_productcatalog database.
There is no way to back up and restore existing on-premise Commerce Server databases and restore them on Azure SQL. All Commerce Server databases on Azure SQL need to be created on Azure SQL, and then you can use Commerce Server Staging, CmdLets, or other tools to export and import data for each subsystem.
Before you begin a setup, be sure to meet the following pre-requisites:
Azure license
Commerce Server installer
To set upCommerce Server admin and site databases set up in Azure SQL, use the following steps:
Log in to the Azure Management Portal, and create or identify a v12 Azure SQL instance that you would like to store your Commerce Server databases. Take note of the full Azure SQL server name, which is typically in the format SERVERNAME.database.windows.net .
Make sure that your current external IP address is added to the allowed ip address list on the Azure SQL Server.
Install Commerce Server on a on-premise Azure Windows server.
Run Commerce Server Configuration Wizard:
Provide the full Azure SQL server name, such as SERVERNAME.database.windows.net .
Use the default admin database name. For example, MSCS_Admin, or update to a name of your choosing.
Change the authentication type to SQL Server Authentication, and add the Azure SQL account that can create databases on that server. Azure SQL does not support Windows Authentication, so you must use SQL Server Authentication.
Follow the rest of the steps in the wizard and finish the set up.
You now have two options to create your Commerce Server Site and Subsystem resource databases against Azure SQL:
PowerShell CmdLets
You can use all of the standard Commerce Server CmdLets for setting up your site and resources. By default, these CmdLets will try to create their database(s) on the same SQL instance as the admin database with 250GB Max Size, the S0 Pricing Tier, and Standard edition. All of these settings can be changed later by using the Azure Management Portal.
Initialize-CSSite,Add-CSCatalogResource,Add-CSInventoryResource,Add-CSOrdersResource,Add-CSMarketingResource,Add-CSProfilesResource, andAdd-CSResourcesare the only CmdLets that create resource databases. so these are the only CmdLets that allow you to target a different Azure SQL Database and set its size during creation. Each of these CmdLets accepts the following Azure SQL specific parameters that allow you to control your database configuration during creation:Add-CSCatalogResource -Name "MySite" -SqlUserName "adminuser" -SqlUserPassword "password" -Edition "standard" -MaxSize "2 GB" -ServiceObjective "S3" -ConnectionString "Server=tcp:server.database.windows.net,1433;Database=MySite_productcatalog;UserID=cataloguser@server;Password=password;Trusted_Connection=False;Encrypt=True;Connection Timeout=30;"
Pup package
You can use existing pup packages, but you cannot set Azure SQL database sizes or editions from the Site Packager UI. If you are automating an installation, you can specify size, edition, and service objectives in the ConnStrs section of your ini file using a AzureCreateDatabaseOptions* property. For an example, see the following. The various options for these parameters can be found at https://msdn.microsoft.com/en-us/library/dn268335.aspx .
[ConnStrs]
ConnStrResourceName0=Biz Data Service
ConnStrPropertyName0=connstr_db_bds
ConnStrFriendlyResourceName0=Profiles
ConnStrFriendlyPropertyName0=connstr_db_bds
ConnStrValue0=*****
AzureCreateDatabaseOptions0=MAXSIZE = 1 GB, EDITION = 'standard', SERVICE_OBJECTIVE = 'S3'
If you already have Commerce Server installed and configured on your server, you will not be able to run the Commerce Server Configuration Wizard. In order to run the Configuration Wizard you will need to run the following from the command line:
C:\Program Files (x86)\Commerce Server 11\csconfig.exe /u
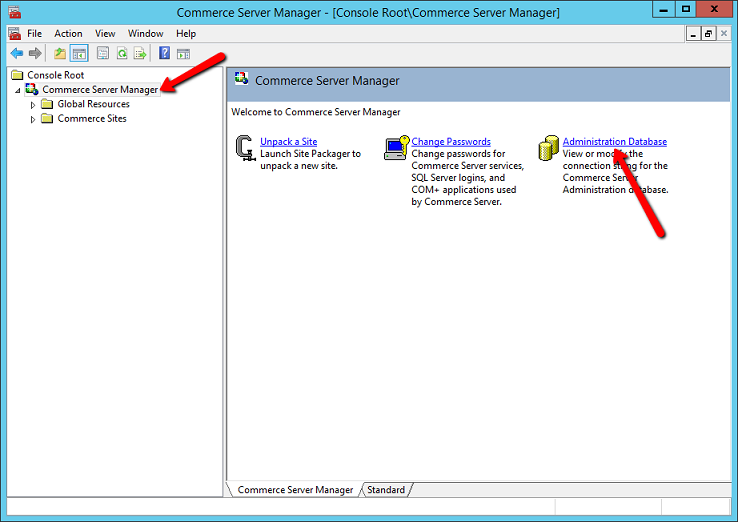
Once this has finished, you will be able to run the Configuration Wizard and configure a Commerce Server instance on Azure SQL. You can change your server at any time to point to a different Commerce Server Admin database by clicking on the Administration Database link in Commerce Server Manager.

No matter what method you are using to set up your Commerce Server site and resources, you have the option to pre-create the required databases for each resource ahead of time in Azure SQL, as long as you select the default collation. A limitation is that you cannot create the MSDC_Admin database ahead of time. If you are using the CmdLets to set up your resources, use the –DatabaseName parameter to set the existing name. If you are using Site Packager, you need to select the database name from the drop-down list on each resource.
If you are configuring Commerce Server from on-premise, the process can be slow. One reason is that the SQL calls now need to travel across the internet instead of your local network. Another reason is that the S0 Price Tier of Azure SQL is not very powerful. You can speed up set up by pre-creating all of the databases you need, except for MSCS_Admin, and temporarily set them with a higher Price Tier than you need. Alternately, you could pass in a higher Price Tier to the CmdLets or PuP ini. Increasing the Price Tier during configuration will allow the commands to finish more quickly and reduce setup time, and then reduce the Price Tier when you are finished set up.
Geo-Replication: Azure SQL Geo-Replication puts Secondaries (secondary data centers), into a read-only state. Currently Sitecore does not support using a read-only database. If you choose to use Azure SQL Geo-Replication you will need to make sure that the Sitecore web tiers, CM, CD, Processing, and Reporting, are in a stopped state until you set the "local" Azure SQL as the Primary database.