Add or edit a domain
Authorize the relevant domains for sending email campaigns.
To establish a good sender reputation and minimize the risk of your email campaign ending up in a spam or clutter folder, in the Email Experience Manager you can validate the domains that you want to use to send email campaigns.
Note
In addition to authorizing the domains, you can warm up your domains by sending email campaigns to a smaller audience to start with that gradually get larger and by making sure that your email campaigns contain good quality content, opted-in recipients, and heathy contact lists.
When you use Sitecore Email Cloud, you only need one option for validating a sending domain and DKIM (DomainKeys Identified Mail) is the best method. You do not have to set up an SPF record for your sending domains, but you can implement it in your custom SMTP setup.
When you use Sitecore Email Cloud, it provides a DKIM record for each of the sending domains that you configure. The DKIM records enables the Internet Service Providers (ISP) that receive your email campaigns to verify the authenticity of the email campaign by comparing the sender domain against the authorized list of domains. This helps to keep your email campaigns out of spam folders and it ensures that others cannot use your domain without permission.
Note
The custom SMTP provider does not support this functionality. To use this functionality, you must use a provider that supports it.
It is important that you only add domains for approved senders that you own and control. If you add generic domain names, such as mycompanytest.com or domains of free email services, such as @gmail.com, they might be removed without warning. If you need an approved sender on a test domain, you must buy the relevant domain name and implement the correct DNS records to validate it.
To add a new domain:
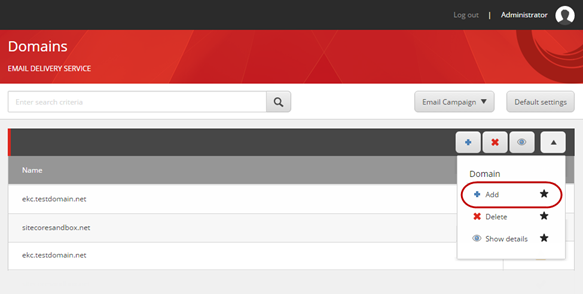
In the EXM menu, under the Administrator section, expand Email Delivery Service and click Domains.
Click Domain
 , and then click Add.
In the Add Domain dialog box, enter the name of the domain. You can use the format domain.net or an IP address, for example, [193.200.33.51].
Click Next. The system validates the domain's DKIM records. If the domain does not have a DKIM record or if they are set up incorrectly, a warning message appears.
Important
If you manually add the TXT record to the domain setup, because of DNS propagation, it can take up to 24 hours for the changes to take effect in EXM.
Click Finish.
From the
Domainmenu, you can:Click Show details, to see the required DKIM setup information for a selected domain.
Click Delete, to remove the selected domain.