Sitecore 5.3 introduced a number of changes associated with Proxy Items. This article describes these changes in detail.
For information on using proxies in versions of Sitecore CMS prior to 5.3 see the following article.
Using Proxy items in Sitecore 5.1.1
1. What is a Proxy Item?
Proxyn. A person authorized to act for another; an agent or substitute.
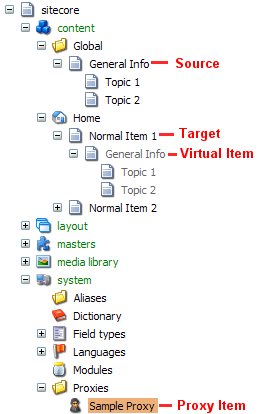
In Sitecore 5.3, when proxy items are enabled, a proxy item instructs Sitecore to generate a virtual item, which acts as though it is the source item, but is displayed in a different location.  Virtual items are displayed in the Content Editor content tree with grey text, as shown in the image to the right.
Proxy items make it possible to show a source item (and potentially its children) in multiple places within the Sitecore content tree. Changes to virtual items are reflected immediately in the source item. Even deleting a virtual item or sub-item deletes the same item at the source.
Proxy items are defined in the /sitecore/system/Proxies folder and specify a source item, the target item or parent to the virtual items generated, whether sub-items of the source should also appear as virtual items, and the database from which to retrieve the source item.

2. Proxy Template
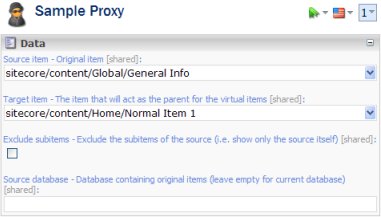
Proxy items are based on the /sitecore/templates/system/Proxy template. The Proxy template includes fields which configure how the proxy works. These include:
- Source item – the original item
- Target item – the item that will act as the parent for the virtual items
- Exclude subitems – if set, Sitecore will only generate a virtual item for the source item itself
- Source database – the database containing the source item. Leave blank if the source is in the current database. For example, if the source item is in the master database.
3. Creating a Proxy Item
This section describes the steps required to create Proxy Items.
- Log in to the Sitecore Content Editor client as an Administrator user.
- Open the Content Editor.
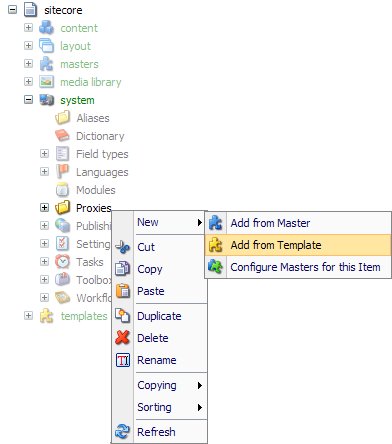
- Locate the /sitecore/system/Proxies folder. Right click on the folder and select the New » Add from Template… popup menu command.

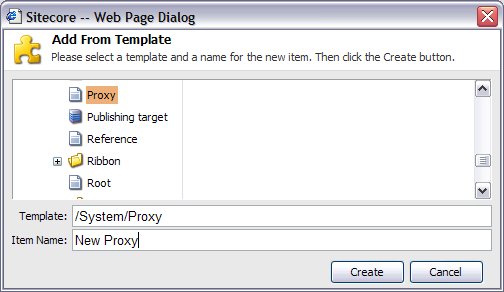
- Select the System » Proxy template and then click Open.

- Provide a name for the proxy item.
- Specify values for the source and target items, and indicate whether Sitecore should exclude subitems.
If you want to reference a source item in another database, specify the name of the database.
- If this is the first proxy you have created, you must configure the appropriate databases to support proxy items. Please refer to the next section.
4. Required Configuration
You must enable proxy items in the Sitecore web.config file.
Each database may have its own proxy settings, which are included as sub-elements in the database element (for example, as sub-elements under the <database id="master"...> element).
Unlike previous releases, proxies are NOT enabled by default. Please be aware that enabling proxies has a negative effect on the performance of the entire site. Enable proxies only if they will be used.
Sitecore includes the following configuration settings:
-
proxiesEnabled - indicates whether proxies are enabled for this database. Value may be true or false.
For example:
<proxiesEnabled>true</proxiesEnabled>
-
proxyDataProvider - link to a type deriving from ProxyDataProvider. This is the class that reads the physical data (for example, from SQL Server).
For example:
<proxyDataProvider ref="proxyDataProviders/main" param1="$(id)"></proxyDataProvider>
-
publishVirtualItems - indicates whether Sitecore should publish virtual items as if they were normal items. Value may be true or false.
If true, Sitecore will copy virtual items to the publishing target (for example, the web database). Once copied to the publishing target, the items will act as normal items (the connection between the virtual item and its source will no longer exist).
If false, Sitecore will only copy proxy definitions to the publishing target. Assuming that proxies are enabled on the publishing target database, Sitecore will then generate virtual items based on the proxy definition in that database. This is the preferred approach.
For example:
<publishVirtualItems>false</publishVirtualItems>
It's very important that the proxy settings for the master database and publishing target are compatible. For instance, in a standard Sitecore installation, there are two valid cases:
- Only proxy definitions published.
<!-- master -->
<database id="master"...
...
<proxiesEnabled>true</proxiesEnabled>
<publishVirtualItems>false</publishVirtualItems>
...
</database>
<!-- web -->
<database id="web"...
...
<proxiesEnabled>true</proxiesEnabled>
...
</database>
- Virtual items published.
<!-- master -->
<database id="master"...
...
<proxiesEnabled>true</proxiesEnabled>
<publishVirtualItems>true</publishVirtualItems>
...
</database>
<!-- web -->
<database id="web"...
...
<proxiesEnabled>false</proxiesEnabled>
...
</database>
5. Proxy Items in the API
When accessing items via the Sitecore API, the Item.ID property of virtual items will contain the ID of the virtual item, not the source item. That is, virtual items all have their own unique ID. Virtual IDs are persistent, however, so they can be used like any other ID. To access the ID of the source item from a virtual item, use:
Item.InnerData.Definition.ID
The RuntimeSettings object includes some properties associated with using Proxy Items (these settings only apply when Proxies are activated):
- Item.RuntimeSettings.IsVirtual: - Indicates whether the item is a virtual item.
- Item.RuntimeSettings.IsExternal: - Indicates whether the source item is from a database other than the target database.
- Item.RuntimeSettings.OwnerDatabase: - The database that owns the source item. Note the Item.Database property will always return the target database.
It is also possible to enable and disable proxies programmatically.
-
bool Sitecore.Context.ProxiesActive
Enable (set to true) or disable (set to false) proxies for the current session.
-
Sitecore.Data.Proxies.ProxyDisabler
Disable proxies for a block of code.Using (new Sitecore.Data.Proxies.ProxyDisabler()) {
// Proxies disabled here
}
6. Installing Proxy Items
This section is currently under construction. Please check back later.