NVelocity is a .Net-based template engine. It permits developers to use the simple yet powerful template language to reference objects defined in .Net code. This article provides two examples which explain how NVelocity can be used in Sitecore.
1. Implementing Extended Mail Action Using NVelocity
Extended mail action extends the functionality of the standard Sitecore workflow mail notification by using the NVelocity template engine. Standard Sitecore email action supports three hard-coded macro expansions: $itemPath$, $itemLanguage$ and $itemVersion$. So instead of sending a static mail notification saying that something had been changed somewhere, it is possible to create a message saying, for example, "Hello. $item.Name item (located at $item.Paths.Path) had been changed".
The NVelocity template engine allows to implement the functionality mentioned above. Below you can see a sample extended message template:
Time: $time
State of the $item.Name item (located at $item.Paths.Path) had been changed from '$state.DisplayName' to '$nextState' by $user.Name ($user.Email).
Item workflow history:
#foreach ($historyItem in $history)
Date: $historyItem.Date | User: $historyItem.User | Action: $historyItem.Text
#end
The resulting message is shown below:
Time: 2/14/2006 3:57:47 PM
State of the Sample Item item (located at /sitecore/content/Home/Test Item/Sample Item) had been changed from 'Reviewing' to 'Final' by Admin ().
Item workflow history:
Date: 2/14/2006 12:09:44 PM | User: sitecore\Admin | Action: Item created
Date: 2/14/2006 12:10:28 PM | User: sitecore\Admin | Action: no comment
Date: 2/14/2006 12:10:41 PM | User: sitecore\Admin | Action: no comments
Date: 2/14/2006 3:57:35 PM | User: sitecore\Admin | Action: no comments
The item was last updated on 2/14/2006 3:57:02 PM.
At first sight it may look like an additional number of hardcoded macros, but the features NVelocity templates provide are much more powerful: using them you can code against the Sitecore API using the Sitecore client as long as the method/property evaluates to string. So now you don't have to start Visual Studio every time you need to change your custom template.
Below is the step-by-step instruction on how to implement Extended Mail Action in your solution.
Select one of the links below to download the ready-made package and source code example for this article:
- Download ready-made package (Sitecore V5.1 package)
- Download source code (Sitecore V5.1 source code)
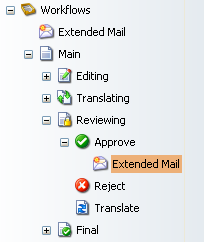
1.1. Create a Custom Workflow Action
Please refer to the article below for a detailed explanation of creating workflow action:
How to cause the workflow to invoke an action
The mailaction sample package contains all Sitecore Items required. The Extended Mail action is placed under the System/Workflows Item by the packager; you should place it under a certain command to make use of this action.
1.2. Create a Class for Generating and Sending Emails
You can download the full source code for this example.
Below is a code snippet which describes how to define the substitutions for the NVelocity template:
      /// <summary>
      /// Populates the velocity template context. Only the objects that were
      /// added in this method will be accessible in the mail template.
      /// </summary>
      /// <remarks>Override this to add your own data to the context</remarks>
      protected virtual void PopulateContext(WorkflowPipelineArgs args)
      {
         velocityContext.Put("args", args);
         velocityContext.Put("item", args.DataItem);
         velocityContext.Put("processor", args.ProcessorItem);
         velocityContext.Put("user", Sitecore.Context.User);
         velocityContext.Put("history", args.DataItem.State.GetWorkflow().GetHistory(args.DataItem));
         velocityContext.Put("state", args.DataItem.State.GetWorkflowState());
         velocityContext.Put("nextState", GetNextState(args));
         velocityContext.Put("site", Sitecore.Context.Site);
         velocityContext.Put("time", DateTime.Now);
      }
1.3. Mail Action at Work
You should follow the instructions given in this article to set up a custom workflow action.
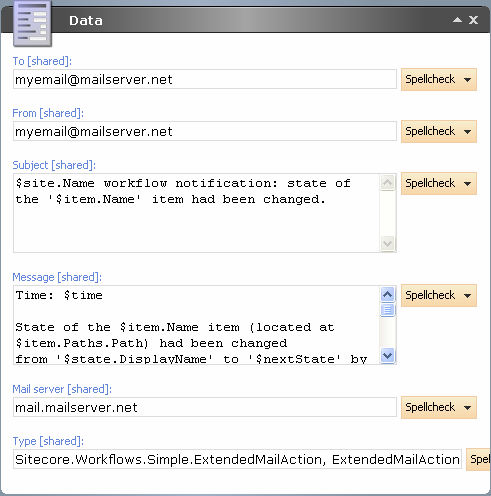
After the action is set up, you should fill the fields of the Data section with appropriate values. You can use the substitutions defined in the PopulateContext method in the subject field and message body.
The Type field is used for referencing the Mail Action library.
2. Setting Current Date by Default in the Datetime Field
This section describes the solution of the following problem:
A field of an Item should be filled with the current date and time upon Item creation.
The steps below should be taken to solve the problem:
-
Create a custom class to override the standard ReplaceItem(…) and ReplaceField(…) methods of the Sitecore.Data.MasterVariablesReplacer class using NVelocity.
-
Copy the compiled assembly to the bin folder and register it in the web.config file.
- Implement substitution in a master.
Full source code samples for this article are available in the download section.
Below is the detailed description of each step required.
2.1. Create a Custom Replacer Class
In order to replace variables entered in the field of a master, we will create a custom VelocityMasterReplacer class which inherits from the Sitecore.Data. MasterVariablesReplacer class. This class will override the ReplaceItem(…), ReplaceField(…) base methods and will use NVelocity methods to replace master variables.
Click here to download the MasterVariablesReplacer source code. The comments below will help you to understand the key points of the code.
We override the ReplaceItem method in order to populate the context: the ReplaceItem method calls the PopulateContext virtual method to fill in the VelocityContext. Then the base method is called.
{
PopulateContext(item);
base.ReplaceItem(item);
}
...
protected virtual void PopulateContext(Item item)
{
VelocityHelper.PopulateFromSitecoreContext(velocityContext);
//VelocityHelper is used here to add current time: context.Put("time",
//DateTime.Now);
velocityContext.Put("item", item);
velocityContext.Put("parent", item.Parent);
}
The ReplaceField method is invoked against each field of an Item. At this point, the NVelocity engine evaluates the template and replaces the field value with the resulting value. After that the default replacer finishes the process :
{
string value = field.Value;
...
field.Value = VelocityHelper.Evaluate(velocityContext, value, "Velocity master variables replacer");
...
base.ReplaceField(item, field);
The Evaluate method processes the velocity template and returns the rendering result.
{
StringWriter result = new StringWriter();
Velocity.Evaluate(context, result, logName, template);
return result.GetStringBuilder().ToString();
}
Below is the description of its parameters:
context - Populated velocity context;
Template - Velocity template to process
logName - Name that will be used to log the event
Alter the MasterVariablesReplacer setting in the web.config file by specifying the namespace, class name and assembly name of your custom replacer class:
<settings>
...
<setting name="MasterVariablesReplacer" value="Sitecore.CoreVelocity.MasterReplacer.VelocityMasterReplacer,Sitecore.Velocity.dll" />
2.2. Using the Replacer
When you enter any variable in a template field specified inside the following method, it will be replaced accordingly:
public static void PopulateFromSitecoreContext(VelocityContext context)
{
// $time will be replaced with the DateTime.Now value
context.Put("time", DateTime.Now);
}
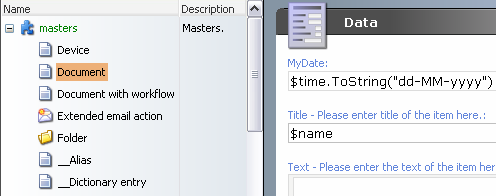
Create a master or use an existing one and enter the substitution in a field. In our example, we enter the $time.ToString("dd-MM-yyyy") substitution in the MyDate field:
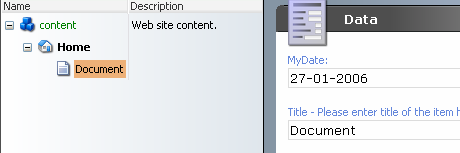
Create an Item from this master. The value of the MyDate field will be replaced with the current date:
This solution works perfectly with the text and html type fields; however, some problems occur with the date field due to the validation. This field type doesn’t allow entering anything except for the valid date.
If your solution requires this particular field type, you should implement a custom field that is inherited from the text field.
2.3. Creating a Custom Date Type Field
You can find the sample MyDate project in the Downloadsection.
Please refer the article below for more information on creating a custom field:
http://sdn.sitecore.net/SDN5/Articles/API/Creating%20a%20Composite%20Custom%20Field.html
2.4. Download
Download MasterVariablesReplacer project
Download MyDate custom field project