This section describes the steps required to configure a custom site in the web.config file.
- Create a start Item in the content tree (or choose from the existing ones).
- Add the <site> definition into the <sites> section of the web.config file and populate it with necessary attributes.
- Modify the hosts file of the server and include the hostName which corresponds to the newly created site.
Important Note: The parameter hostName is case sensitive and must be spelled hostName not hostname otherwise multiple logical sites will not work
The following example illustrates the process:
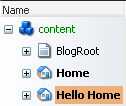
Create the Hello Home Item as shown in the picture below:

This item will serve as a root for your custom site.
Add the following <site> definition into the <sites> section:
<site
name="helloworld"
hostName="www.helloworld.com"
virtualFolder="/"
physicalFolder="/"
rootPath="/sitecore/content"
startItem="/Hello Home"
language="en"
database="web"
domain="extranet" />
Pay attention to the hostName and startItem attributes.
Add the following line into the hosts file:
127.0.0.1 www.helloworld.com
Now visit the website with the following URL: http://www.helloworld.com. The content of the Hello Home Item will be displayed.
IMPORTANT NOTE: Sitecore clears cache upon each publishing. The Cache Clearer is bonded to specific sites. So if you add a new site where caching is important or rename the standard website site, you should also add/rename appropriate sites under the publish:end event in the <events> section. Read more about this issue.
This section lists and describes the attributes of the When multiple sites tied to different domain names are defined, the cross links between the sites are generated incorrectly. In this section, you will find the detailed examples which show how to configure a custom site in the web.config file![]() Prev Next
Prev Next ![]()