Sitecore versions : tested with 5.1.1.11. Expected to work with 5.1.1.x releases.
The following steps are required to implement the functionality in subject:
-
Add a new field to the edit user.xml dialogue .
-
Create helper Items
for a custom code beside class and for the field itself. These Items will be used to store the value of the custom user property.
-
Create code beside class which will handle the custom User Property field and write appropriate values to the helper Items.
- Create a custom Login processor which will handle the User Property values stored in the helper Items.
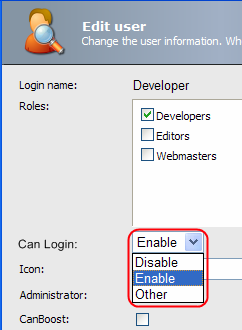
1. Customizing User Properties Dialog
Customize the User Properties dialog: \sitecore\shell\Applications\Security\Edit User\edit user.xml.
To do that, follow the steps below:
-
Copy the current Edit User control from \sitecore\shell\Applications\Security\Edit User\edit user.xml to the \sitecore\shell\override\ folder, which is specifically intendedfor the case when you need to replace (override) the current functionality of a control.
Note: After upgrading to a new Sitecore version, your custom control will still be working and the files in the /override folder will not be overwritten. Sitecore takes the control with the same name from the /override folder first.
- Add a custom field to \sitecore\shell\override\edit user.xml XAML application:
<Literal Text="Can Login:" GridPanel.NoWrap="true"/>
<Combobox ID="CustomListBox" Height="128"/>
…
</GridPanel>
Our Custom List Box will consist of three values: Disable, Enable and Other.
2. Helper Items
The EditUserForm code beside class supports only the text and checkbox field types. Our solution requires a drop-down list field type. The values of this field will be stored and retrieved from the Items listed below.
Create the following Item structure:
/content/Security/Domains/sitecore/
/content/Security/Domains/sitecore/Admin
/content/Security/Domains/sitecore/Editor
...
/content/Security/Domains/extranet/
...
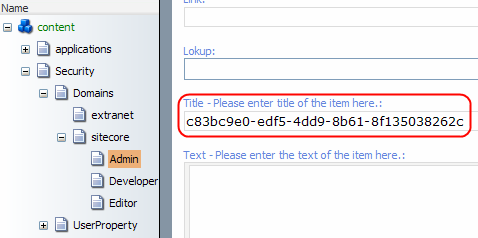
We create Items with the appropriate User names and save the value of the User Property field in the Title field of each User Item.
The combo box values are retrieved from the following location:
/content/Security/User/Property/
/content/Security/User/Property/Enable
/content/Security/User/Property/Disable
/content/Security/User/Property/Other
...
The value of the User Property field is saved in the Title field of each User Item as a GUID of the appropriate option Item.
3. Creating a Custom Code Beside Class
Inherit a new CodeBeside class from the Security.EditUser.EditUserFormclass as it is shown below:
namespace MyApp
{
   public class CustomEditUserForm : EditUserForm
   {

      const string ROOT_USER_PROPERTY = @"/sitecore/content/security/UserProperty";
      const string USER_PATH = @"/sitecore/content/security/Domains/{0}/{1}";
      const string USER_TEMPLATE = "Document";
      const string USER_FILED = "Title";

      protected Combobox CustomListBox;

      protected override void OnLoad(EventArgs args)
      {
         base.OnLoad(args);

         if (!Context.ClientPage.IsEvent)
         {

            string getDO = WebUtil.GetQueryString("do");
            if (getDO.Length == 0)
            {
               getDO = Context.GetDomainName();
            }
            this.Domain = getDO;
            string getID = WebUtil.GetQueryString("id");
            Error.Assert(getID.Length > 0, "Querystring parameter \"id\" not found.");

            // Get a user to edit
            UserItem userItem =  Factory.GetDomain(this.Domain).GetUser(getID);
            Error.Assert(userItem != null, "User \"" + getID + "\" not found");

            Sitecore.Data.Database master = Factory.GetDatabase("master");
            // Read additional properties from the custom source
            Sitecore.Data.Items.Item securityStatus = master.Items.GetItem(ROOT_USER_PROPERTY);
            foreach(Sitecore.Data.Items.Item item in securityStatus.Children)
            {
               ListItem listitem = new ListItem();
               CustomListBox.Controls.Add(listitem);
               listitem.Header = item.Name;
               listitem.Value = item.ID.ToGuid().ToString();
               listitem.ID = Control.GetUniqueID("I");
               listitem.Selected = false;

               // Set up selected value
               Item itemUserProperty = master.Items[String.Format(USER_PATH, this.Domain, userItem.Name)];
               if (itemUserProperty != null && itemUserProperty.Fields["Title"].Value == listitem.Value)
               {
                  listitem.Selected = true;
                  Sitecore.Diagnostics.Log.Info("Title: " + itemUserProperty.Fields["Title"], this);
               }
            }
         }
      }


      protected override void OnOK(object sender , EventArgs args)
      {

         string getID = Context.ClientPage.ServerProperties["id"] as string;
         UserItem userItem = Factory.GetDomain(this.Domain).GetUser(getID);

         string userCustomProperty = Context.ClientPage.ClientRequest.Form["CustomListBox"];
         Database db = Sitecore.Configuration.Factory.GetDatabase("master");
         Item itemUserRoot = db.Items[String.Format(USER_PATH, this.Domain, string.Empty)];

         Item itemUserProperty = db.Items[String.Format(USER_PATH, this.Domain, userItem.Name)];
         // Create appropriate user value in a custom location (/content/Security/Domains/sitecore/)
         if ( itemUserProperty == null )
         {
            using (new SecurityDisabler())
            {
               TemplateItem template = db.Templates[USER_TEMPLATE];
               itemUserProperty = itemUserRoot.Add(userItem.Name, template);
            }
         }

         // Save value in a custom location (/content/Security/Domains/sitecore/...)
         using (new EditContext(itemUserProperty))
         {
            itemUserProperty.Fields["Title"].Value = userCustomProperty;
         }

         base.OnOK (sender, args);

      }

   }
}
4. Creating Custom Login Processor
Create a custom Login processor and put it in the pipeline:
<login argsType="Sitecore.Pipelines.Login.LoginArgs">
<processor mode="on" type="Sitecore.Pipelines.Login.LoginCookie, Sitecore.Kernel" />
<processor mode="on" type="Sitecore.Pipelines.Login.DI, Sitecore.Kernel" />
<processor mode="on" type="Sitecore.Pipelines.Login.Login, Sitecore.Kernel" />
<processor mode="on" type="Custom.PreventLogin, MyApp.LoginProcessor" />
<processor mode="on" type="Sitecore.Pipelines.Login.Settings, Sitecore.Kernel" />
</login>
The processor will prevent users from logging into the client according to the helper Items:
/content/Security/Domains/sitecore/Editor will control the login rights of the Editor User and so on.
A sample Login processor code is listed below:
public void Process(LoginArgs args)
{
      Domain domain = Context.Domain;
      if ((args.IsPostBack && !args.Success) && ((args.Username.Length > 0) && (domain != null)))
      {
            try
            {
               // Check that user is not enabled from the /content/Security/Domains/sitecore/*.*
                  ….
                  if (<Enabled>)
                  {
                        args.Success = true;
                  }
                // <User is Disabled>
                  else
                  {
                        args.Warning = "User is temporary disabled!");
                  }
            }
            catch (Exception exception)
            {
                  args.Warning = exception.ToString();
                  Log.Error(“User Exception:”, exception, this);
            }
      }
}