Walkthrough: Adding a customized editor rendering
Set the object rendering to enable Document Publisher users to adjust object settings, such as width, height, and position.
For Document Publisher users to be able to change the content of text and image frames in their documents, object rendering is set up in the Sitecore.Odg.config file (Website/App_Config/Include/PXM/Sitecore.Odg.config). By default, the Sitecore.Odg.config file contains keys for changing the content of text and image frames.
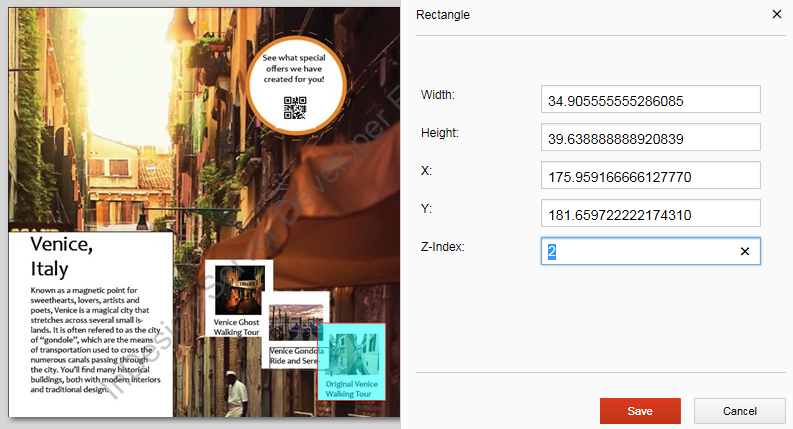
This walkthrough describes how to add edit possibilities for ODG’s Document Publisher module. The example in this walkthrough shows you how to add the possibility to edit the Z-Index for a shape, which lets Document Publisher users arrange the position of shapes on the page. For the Z-Index, you can assign each content item a number. An item with a higher number overlaps an item with a lower number. In the following screenshot, the Document Publisher user can adjust the width, height, x/y position, and Z-Index of a rectangle.
 |
This walkthrough outlines how to:
By default, Document Publisher users can edit the content of text and image frames. You can customize the Document Publisher editing options by adding object renderings to the Sitecore.Odg.config file, for example, by adding an object rendering for shapes.
To add an object:
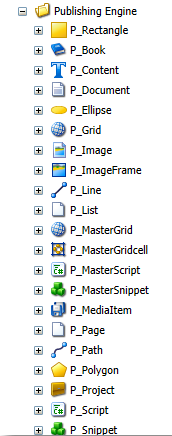
Choose one of the Print Studio objects, for example, a shape: P_Rectangle (sitecore\Templates\Print Studio Templates\Publishing Engine).
Note
For the example in this walkthrough, you need the Sitecore Rocks Visual Studio plug-in.
In the
Sitecore.Odg.configfile, add a line for the new object. You can copy one of the default lines and change that. An appropriate existing rendering for a shape is the one with item ID{CC74880A-49B7-474F-9E2B-69A05413FA87}.
As shapes do not contain data, you can leave the dataRenderingId empty. For now, you can add the type key= "P_Rectangle" line to the Sitecore.Odg,config file:
<documentEditor>
      <editorTypes>
        <type key="P_TextFrame" renderingId="{CD8E4F2F-A6A4-4DEC-9406-39DE5C4E9C1F}" dataRenderingId="{405DF344-671F-4EC3-AA07-6EFD0E39FD42}" additionalRenderings="{CC74880A-49B7-474F-9E2B-69A05413FA87}|{23DEAD5B-8A42-4432-A9F6-FBE28BF14980}"/>
        <type key="P_ImageFrame" renderingId="{8CF4552A-2822-4A32-9E06-84C70E6C6A78}" dataRenderingId="{405DF344-671F-4EC3-AA07-6EFD0E39FD42}" additionalRenderings="{CC74880A-49B7-474F-9E2B-69A05413FA87}"/>
        <type key="P_Rectangle" renderingId="{CC74880A-49B7-474F-9E2B-69A05413FA87}" dataRenderingId="" additionalRenderings=""/>
      </editorTypes>
    </documentEditor>
Now you can set up the additional rendering for the third dimension: depth.
Because the new item requires additional rendering that are not defined in existing data templates, you need to create a new template.
To create a template for the new Z-Index rendering:
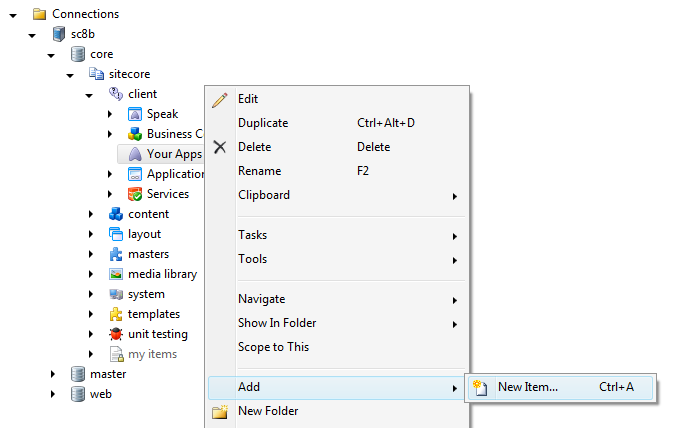
Right-click the folder in which you want to add your template, click Add, New Item.
Note
You should not save the new template in the ODG folder because the template will be lost when updating ODG.
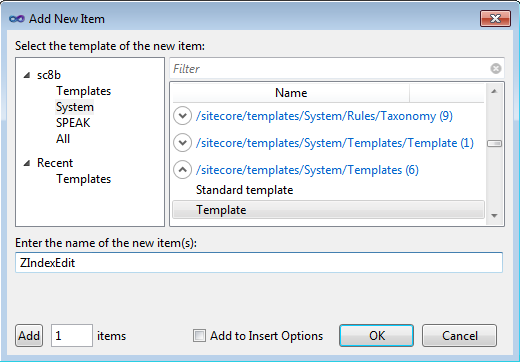
In the Add New Item dialog box, under /sitecore/templates/System/Templates, click Template and enter the item name and then click OK.
To create the standard field item, right-click the new template and click Create Standard Values.
Now you can start editing the speak layout for your control. Right-click the Standard Values item of the ZIndexEdit template and click Tasks, Design Layout.
Browse for and select the Speak-EmptyLayout and click OK.
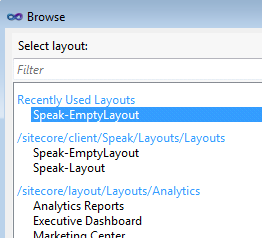
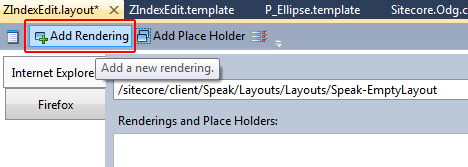
Click Add Rendering and then select the SubPageCode rendering and click OK.
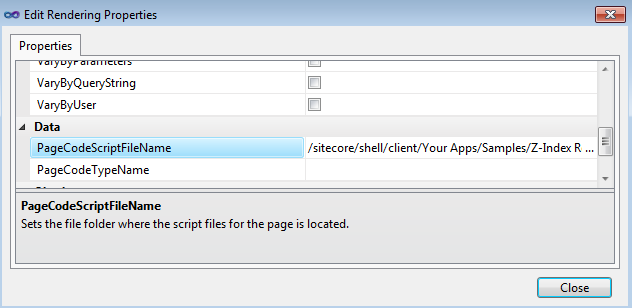
Double-click the SubPageCode rendering to open the rendering's properties dialog and enter the path to the required javascript file. In this example: /sitecore/shell/client/Your Apps/Samples/Z-Index Rendering/ZIndexEdit.js.
Now add Label and TextBox renderings. You can also add additional renderings to improve the appearance.

Now you can add the control that enables Document Publisher users to change the Z-Index field of content items. The rendering template is saved in Sitecore/client/Your Apps/…. in the core database. Add the control and attach the template that you created earlier to get the Item ID you need for your config file.
To add the control:
Right-click the location you want to create a new item named ZIndexEditRendering, and add a new item by selecting the ZIndexEdit template that you created earlier.
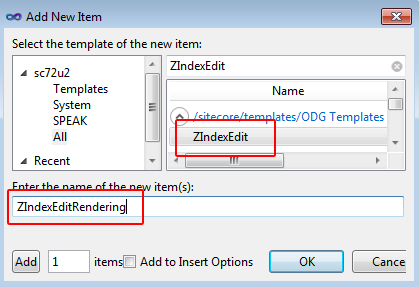
The Item ID of ZIndexEditRendering is the ID that you can use in your config file for renderingId or additionalRenderings.

The following is an example of the javascript code that is referenced in the template. You need to write this code before you create the template.
Go to /sitecore/shell/client/Your Apps/Samples/Z-IndexRendering and create a folder (for example, ZIndexEditRendering) and file (for example,
ZIndexEdit.js: the file that is referred to in the PageCodeScriptFileName field of the SubPageCode rendering). The control is responsible for changing the Z-Index field of the item that is passed to the editing control.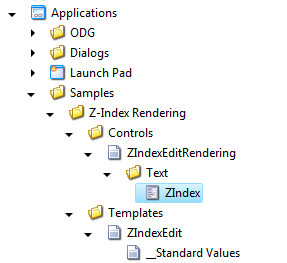
Write the code that enables displaying and changing the Z-Index field value. The script must include the following methods:
isValid- to validate the input.hasChanges- to check whether there are any changes.acceptChanges- to do additional operation post-saving.
For example:
define(["sitecore"], function (_sc) {
   var zIndexEdit = _sc.Definitions.App.extend({
     initialized: function () {
       this.set("item", null);
       this.on("change:item", this.loadItem, this);
       this.ZIndexTextBox.on("change:text", this.changeValue, this);     },
     loadItem: function () {
       var item = this.get("item");
       if (item != null) {
         this.originalZIndex = item["Z-Index"];
         this.ZIndexTextBox.set("text", item["Z-Index"]);       }     },
     changeValue: function () {
       if (!this.isValidInteger(this.ZIndexTextBox.get("text"))) {
         $("[data-sc-id=ZIndexTextBox]").css("border-color", "red");       }
       else {
         $("[data-sc-id=ZIndexTextBox]").css("border-color", "");       }
       var item = this.get("item");
       if (item["Z-Index"] != this.ZIndexTextBox.get("text")) {
         item["Z-Index"] = this.ZIndexTextBox.get("text");       }
     },
     isValidInteger: function (value) {
       var regEx = /^\d+$/;
       return (regEx.test(value));     },
     hasChanges: function () {
       var item = this.get("item");
       if (this.originalZIndex != item["Z-Index"]) {
         return true;       }
       return false;     },
     isValid: function () {
       var item = this.get("item");
       if (!this.isValidInteger(item["Z-Index"])) {
         return false;       }
         return true;     },
      acceptChanges: function () {
         var item = this.get("item");
         this.originalZIndex = item["Z-Index"];     },
   });
   return zIndexEdit; });
Now you have gathered all the information that you need to change the Sitecore.Odg.config file. If you only want to add the possibility to edit the Z-Index of the shape P_Rectangle, you add ZIndexRendering id ({23DEAD5B-8A42-4432-A9F6-FBE28BF14980}) to the additionalRenderings attribute of the P_Rectangle key:
<type key="P_Rectangle" renderingId="{CC74880A-49B7-474F-9E2B-69A05413FA87}" dataRenderingId="" additionalRenderings="{23DEAD5B-8A42-4432-A9F6-FBE28BF14980}"/>
As you can see, the Document Publisher user now has the possibility to change the size, position, and depth of the rectangle on the page.
 |
You can also add the additional rendering to the other keys. You can add as many renderings as you like in the additionalRenderings attribute. Make sure the list of rendering IDs is separated by “|”. In the example below, the Attributes Edit and the Z-Index rendering have been added for text frames.
<type key="P_TextFrame" renderingId="{CD8E4F2F-A6A4-4DEC-9406-39DE5C4E9C1F}" dataRenderingId="{405DF344-671F-4EC3-AA07-6EFD0E39FD42}" additionalRenderings="{CC74880A-49B7-474F-9E2B-69A05413FA87}|{23DEAD5B-8A42-4432-A9F6-FBE28BF14980}"/>
These additional renderings allow Document Publisher users to change not only the content (the dataRenderingID), but also the size and position (the first additional rendering) and the depth (the second additional rendering) for text frames.