Manage your Sitecore Azure service
Learn how to get the most out of your Sitecore Azure service.
Use this topic to navigate Sitecore Azure and learn what the different menu action items are, how to publish to a Sitecore Azure content delivery environment, how to move a location from staging to production, change the default Azure SQL database service tier, and enable Batch Upload. Sitecore Azure provides a map overlaid with icons that represent available Microsoft Azure hosting locations.
The global endpoint map displays the the locations of a variety of environment types.
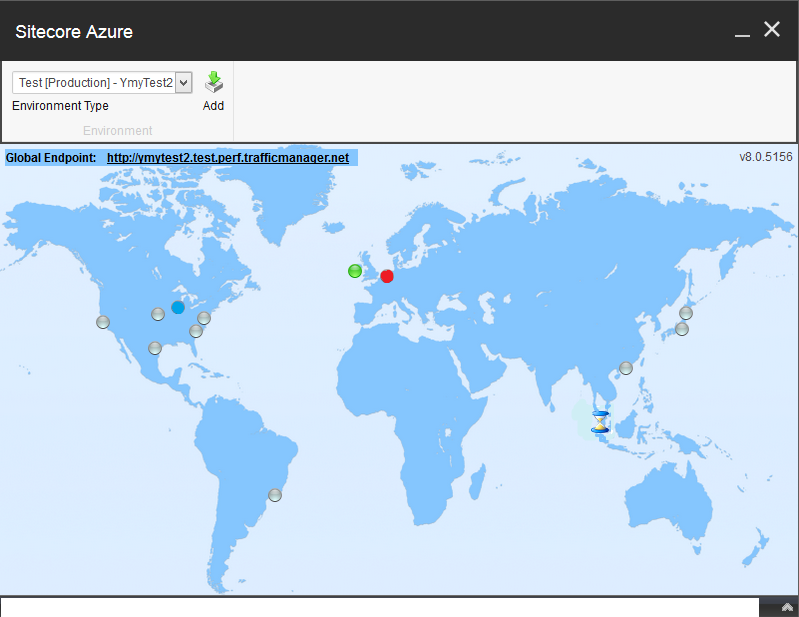
Each icon, and the color of the icon, indicate the status of the deployment in that environment:
Gray Circle: Unused. You can create a content delivery farm or a content editing farm.
Green Circle: Started. You can access the content delivery or content editing farm over the internet.
Red Circle: Suspended. The farm will no longer accept any traffic. However, you can start the farm again.
Blue Circle: A farm has been created but it is not yet deployed.
Hourglass: Busy. Sitecore Azure is attempting to start, suspend, delete, or otherwise manage the location, or the current operation for the location is queued.
Note
Sometimes the Sitecore Azure user interface can seem unresponsive because of long-running remote service calls.
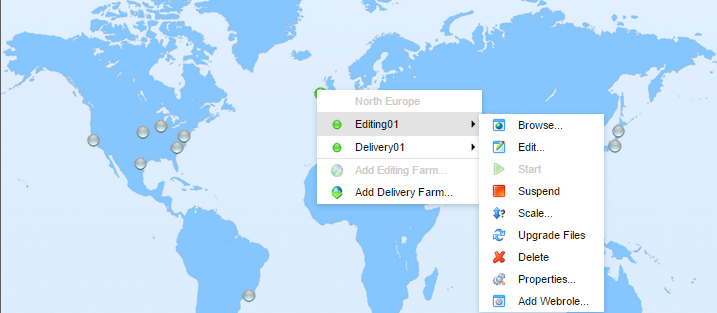
You can click a location circle and select Editing or Delivery, and then select the action that you want to perform on the editing or delivery farm. You can also open multiple Sitecore Azure windows in the Sitecore desktop to access the status of tasks in multiple locations.
The following table describes the different actions you can carry out on a location in either the Editing or Delivery menus.
Action | Description |
|---|---|
Browse | Review your website in the cloud. Start /Suspend |
Edit | Edit your website in the cloud via the website backend. |
Start/Suspend | Start or suspend the Sitecore content delivery / editing instances, (Microsoft Azure web roles). ImportantWhen you suspend a role it is not deleted. The instance and costs are still incurred while the role is suspended. If you no longer use the instance, wait for the Suspend operation to complete, then click Delete to remove it from the cloud entirely. |
Scale | Change the number of instances in a Sitecore Azure content delivery / editing environment to configure at this location. NoteMicrosoft recommends that you create at least two web role instances in each location. When there are two or more web role instances, there is no downtime when you upgrade the files and you get the 99.9% availability as stated in Microsoft’s Service Level Agreement. |
Upgrade files | Deploy and upgrade files to a Sitecore Azure content delivery / editing environment. The new files are added to the farm as a whole without any downtime if there is more than one instance. NoteThis operation only works with files, no database or item changes are applied. |
Delete | Remove all instances from an environment. NoteYou must first suspend Sitecore Azure content delivery / editing instances before you can delete them. |
Properties | See a status of the selected location. |
Add webrole | Extend the number of web roles. |
Warning
Some operations in the Sitecore Azure user interface, such as adding or removing an SQL Azure publishing target database and updating configuration, cause ASP.NET to restart. These operations can therefore interfere with other users and processes on the system.
Deployment operations will also cause an ASP.NET restart during the final stage. If you attempt to run multiple deployments concurrently, Sitecore will wait until all deployments are finished to trigger the ASP.NET restart and for the changes in all deployments to be available.
Publish to a Sitecore Azure content delivery environment with the publishing target database associated with the Microsoft Azure location.
Note
If you have chosen a live mode deployment for your Sitecore Azure farm, you do not need to run a publishing operation. Attempting to run a publishing operation when your site is configured for live mode may generate runtime errors. Live mode only app lies to Content Editing farms. An on-premise solution that runs on live mode will not automatically reflect changes in your Sitecore Azure deployments in the cloud.
You can move a location from Staging to Production by clicking the location, expanding the farm that you want to move, and then clicking Swap.
The default service tier is 250 GB – Standard S2 edition, but you can change this on the template before deployment. The size of the databases is set to maximum by default.
To change the default Azure SQL Database Service Tier, in the Content Editor, navigate to
sitecore/Templates/Azure/Databases/Azure SQL Database/_Standard Values.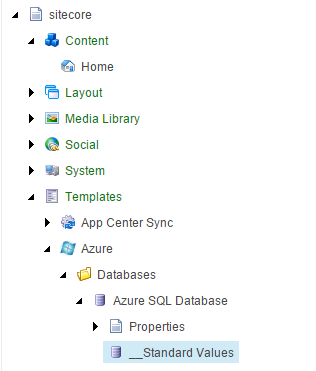
In the Tier field, specify the service tier. This sets all databases (Core, Master, and Web), to the same size and service tier.
Note
After deployment, you must make any further changes (including assigning different sizes and service tiers for the databases) in the Microsoft Azure Portal.
To enable a batch upload, open the Sitecore.Azure.config file of your Sitecore installation, located at website/AppConfig/Include and change the Azure.BulkCopyBatchSize value to the relevant batch size. The value must be greater than zero.