This article guides you through the process of creating your first Sheer UI application for the Sitecore Client. We will create a playground for you to experiment with the new technology and explore its possibilities.
1. Introduction
XAML (eXtensible Application Markup Language, pronounced as ‘zaml’) is the new declarative markup language used to create user interfaces. XAML combined with the Avalon graphics engine is one of the main pillars of the ‘Longhorn’ new generation OS from Microsoft. However, you don’t have to wait that long in order to use it. Sitecore V5 introduces a new feature called XML layouts. Now you can create rich and powerful user interfaces faster than ever before, using the XML markup and Sheer UI as a rendering engine.
Once you are done with this material, you will be able to advance to the Publish Queue Viewer article, which describes how to build a Publish Queue Viewer application that will show a list of Items waiting for publishing, showing how to work with most advanced and ready-to-use controls.
Prerequisites:
Links:
- http://msdn.microsoft.com/library/default.asp?url=/library/en-us/dnintlong/html/longhornch03.asp
- http://www.xaml.net/
- http://www.xamlblogs.com/
1.1. Sample Code
The examples used in this article are available for download. We recommend creating the objects and typing in the code yourself as this will help you understand the material, but if you don’t have time to do so, you can simply install the “firstxamlapplicationsample” package (available in the 'package' folder of the sample download) and have it all installed in seconds.
The firstxamlapplicationsample.zip Sitecore package will add the “SDN5 Samples” folder to the Sitecore menu. This menu includes the “Xml Playground” application.
The source code is also included. We recommend that you use Visual Studio .NET for viewing and modifying the code.
2. Understanding XML
This article assumes that you are already familiar with the XML markup language. XAML is built up in the same way as any XML document, but instead of describing the data, it describes the UI object model. Each tag corresponds to a managed class and tags attributes are mapped to the class properties. So when you add the <Literal Text=”Hello” /> tag to the page, you are actually instructing runtime to instantiate a new object of Literal type and initialize its ‘Text’ property with ‘Hello’ value.
As in XML, you can also nest tags. A tag always has only one parent, but any number of children (although adding children doesn’t always make sense). When you nest tags in the following way:
<Literal Text="Hello" />
</Border>
you instruct the runtime to create and initialize a Border object and then populate its Controls collection with the new Literal object.
Of course, these are only a few basic concepts. If you want to read more about XAML, please refer to the related links in the Introduction of this article or search for more information on the Internet (for example, via Google) where you can find a great deal of additional information.
3. Creating the Application
In this section, we walk through the steps required to create a simple XAML application and add it to Sitecore Client. You will use it as a testing ground for the next articles.
3.1. Application
The article assumes that you already know how to edit the Sitecore client to create and add a regular .html application (if not, please read the Editing the Sitecore client and Adding an Application Shortcut, and Creating XML application articles). Adding an XML application implements the same principles.
Open the Layout Studio and select File » New » XML Layout to create a new XML Layout. For this example, we call the layout ‘XmlPlayground’. Sitecore will automatically generate the following template:
Note: make sure to place the xml file in the /layouts folder. Otherwise you will need to update the controlSources section of web.config.
<control >
<XmlPlayground>
<FormPage>
<CodeBeside Type="My.XmlPlaygroundForm,XmlPlayground.dll"/>
</FormPage>
</XmlPlayground>
</control>
This code defines the main page of your application and binds a code-beside class to it. We will learn more about the code-beside class in the next section.
Now follow the procedure described in Adding an Application Shortcut to create an application using the XAML layout you’ve just created. Create an application shortcut and point it to the application.
3.2. Code-Beside
Before starting our application we have one thing left. We need to create a code-beside class which will handle our custom logic, much like the code-behind class in asp.net.
Using Visual Studio .NET, create a new class, reference the sitecore.kernel.dll assembly and inherit from Sitecore.Web.UI.Sheer.BaseForm class. Then compile the assembly and put it in the bin folder of your installation. Modify the <CodeBeside /> tag in the XML layout, changing the default values to point to your class.
That’s it. Start your application. If you’ve done everything right, you should see an empty Sitecore window. That’s a good start!
![]()
4. Using Controls
The Sitecore.Web.UI.HtmlControls namespace contains a large number of ready-to-use out-of-the-box controls. We will experiment a little and add a few simple ones and then learn how to position them.
Explore the HtmlControls namespace to see all of the controls. There are dozens of them, so we will focus on the most important ones.
4.1. Adding Controls
To add a control to a page, you simply need to add the corresponding tag to the layout. This section shows how to add a few simple controls.
4.1.1. Literal
Literal is a simple text container. The only property named ‘Text’ holds the actual text.
Example:
4.1.2. Edit
Edit control is the Textbox analogue. It has three properties:
| Property Name | Meaning |
| Hidden | Enables or disables visibility of the control |
| Password | When set to true, content will be masked with asterisks (used to input passwords) |
| Value | Holds the literal contents of the control. |
Example:
4.1.3. Checkbox
Checkbox is another widely used control.
| Property Name | Meaning |
| Checked | Whether the checkbox is checked or not |
| Header | Literal description that will be rendered near the checkbox |
| HeaderStyle | Style that will be applied to the Header |
| Value | Literal value of the checkbox. “1” if checkbox is checked, empty string if it's not |
| Click | Method to invoke when the checkbox is clicked |
Example:
4.2. Control Layout
Adding controls is simple, but to add them in the right places we need to learn how to define positioning in XAML.
4.2.1. GridPanel
We’ll use the Sitecore.Web.UI.WebControls.GridPanel control as a container for the rest of the controls on our page. GridPanel renders to html as a table, with each of its children in a separate row, thus embedding each control in <tr><td></td></tr> tag constructions.
Note: You can use the ‘Columns’ property of the GridPanel to define the table. If you need three columns, simply add Columns=”3” in the GridPanel tag.
<Literal Text="My very own XAML app!" />
</GridPanel>
The above structure will be translated to:
<tr>
<td>My very own XAML app!</td>
</tr>
</table>
The class property in the GridPanel sets CSS class for the HTML table. The remaining properties mirror their HTML table counterparts as well.
4.2.2. Border
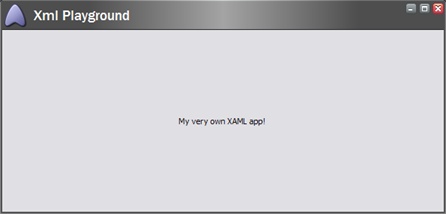
To align the text, let’s use another container control – Border. Border renders as a simple <div>[children]</div> block and allows you to separate one or several controls from the others (perhaps to apply some special style to it).
<Border align="Center">
<Literal Text="My very own XAML app!" />
</Border>
</GridPanel>
By adding the Border control, we’ve changed our only table cell from:
to:
At this point your layout should look similar to this:
<FormPage>
<CodeBeside Type="FirstXamlExample.XmlPlaygroundForm,FirstXamlExample.dll"/>
<GridPanel class="scBackground" vAlign="top" Height="100%" Width="100%" Cellpadding="5">
<Border align="Center">
<Literal Text="My very own XAML app!" />
</Border>
</GridPanel>
</FormPage>
</XmlPlayground>
</control>
Start the application again (or instead of opening a new window, you can use Ctrl+RightClick and select Refresh from the context menu).
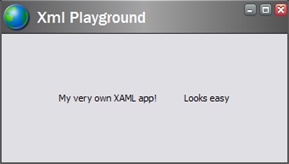
4.2.3. Space
Many developers are familiar with the technique of inserting 1px blank images and sizing them to the needed size to tweak the document layout. The Space control is used exactly for this purpose. Let’s insert another literal inside the border:
<Literal Text="My very own XAML app!" />
<Literal Text="Looks easy" />
</Border>
That would result in the second literal being placed right after the first one without any space between them. Of course, you can use other techniques to separate the content, like adding a column or using CSS styles, but often a blank image is a fast and effective solution. Add the Space control between the two literals:
<Literal Text="My very own XAML app!" />
<Space Width="32px" />
<Literal Text="Looks easy" />
</Border>
The resulting application is shown below.
The generated html markup is:
<div align="Center">
My very own XAML app!
<img src="/SdnArchive/sitecore/images/blank.gif" border="0" alt="" width="32" height="1" align="absmiddle"/>
Looks easy
</div>
</td>
Note: You can also use the Height property of the Space control if desired.
5. Handling Events
Most user controls must respond to user interaction. There are several ways to handle user events, such as: using simple asp.net-like postbacks, using the messaging system, and catching events directly in the code-beside class.
Add the following construct to the layout to test each of these forms for handling user events.
<Edit ID="Edit" Width="300" />
</Border>
<Border align="center">
<Button Header="Method" Click="OnMethodButton" />
<Button Header="Message" Click="playground:messagebutton" />
<Button ID="BesideButton" Header="Postback" />
</Border>
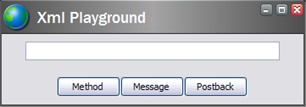
The following sections walk through each of the three possible ways of handling the button click event.
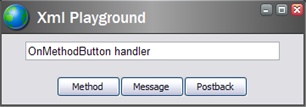
5.1. Invoking a Method
Look at the first button:
1. The Header property specifies the text on the button. Note that the Click property is set to “OnMethodButton”.
-
Edit the code-beside class created in this section and add a reference to the Edit control defined above by adding the following field to the class:
protected Sitecore.Web.UI.HtmlControls.Edit Edit;Note: Notice that we’ve used the ID property of the Edit control to reference it. This works in the same way as it does in asp.net.
-
Add the OnMethodButton method:
protected void OnMethodButton()
{
Edit.Value = "OnMethodButton handler";
} - Compile the assembly, make sure that you put it in the /bin folder of your Sitecore installation.
- Refresh the application and click the ‘Method’ button:
5.2. Messaging
Now look at the second button.
Note that the Click property is set to a different value. Add another method to the code-beside class and mark it with HandleMessageAttribute attribute, passing “playground:messagebutton” to its constructor as shown below:
protected void MessageButton(Message message)
{
Edit.Value = "playground:messagebutton handler";
}
Rebuild, refresh, and click the ‘Message’ button to test.
Messaging is a more powerful tool than a simple method invocation. It can be used to communicate with other applications (that is why it is a good practice to prefix your message with a namespace if you intend to use it across applications) and can also have parameters. Explore the Message class to see what it contains.
5.3. Events
You can also use regular .NET events to react to user input. Look at the third button
It doesn’t have a Click property set, so it will simply make a postback when clicked. But the button does have an ID property assigned, which we will use to reference it in code-beside class. We can catch the Clicked event of the button as usual:
// OnLoad method is fired when the form is loading, similar to the asp.net
protected override void OnLoad(EventArgs args)
{
// Subscribe to the event
BesideButton.OnClick += new EventHandler(BesideButton_OnClick);
}
// handle the event
private void BesideButton_OnClick(object sender, EventArgs e)
{
Edit.Value = "BesideButton_OnClick handler";
}
Rebuild, refresh, and click the ‘Postback’ button to test.
6. State Management
More complicated applications will require a state management facility. Your code-beside class is instantiated each time the User posts back, so you cannot simply store the state information in a class attribute. Fortunately, Sitecore provides the ServerSettings property in the ClientPage class for storing and retrieving state information. The ServerSettings property is a System.Web.UI.StateBag class (similar to asp.net ViewState).
Sitecore supports two kinds of state storage facilities: the file system and the SQL database (the file system by default, controlled by the ViewStateStore setting in web.config).
Perform the following steps for a simple example of storing and retrieving state information.
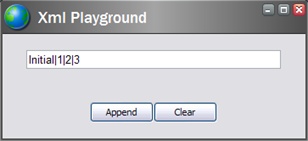
- Add these buttons to the layout: <Button Header="Append" Click="OnAppend" />
<Button Header="Clear" Click="OnClear" /> - Add the PersistentValue property to your code-beside class. This will hold the actual persistent value: protected string PersistentValue
{
get
{
return Context.ClientPage.ServerProperties["PersistentValue"] as string;
}
set
{
Context.ClientPage.ServerProperties["PersistentValue"] = value;
Edit.Value = value;
}
}The property stores the previous Edit value.
- Initialize the Edit control with an initial value:
// OnLoad method is fired when the form is loading,
// similar to asp.net
protected override void OnLoad(EventArgs args)
{
// This is how you can determine whether application is just
// launching or handling postback, similar to the
// Page.IsPostBack in asp.net
if (!Context.ClientPage.IsEvent)
{
PersistentValue = "Initial";
}
} - Add the button handlers: protected void OnAppend()
{
// Append current Edit value to the previous persisted one
PersistentValue = PersistentValue + "|" + Edit.Value;
}
protected void OnClear()
{
// Clear the persisted value
PersistentValue = string.Empty;
} -
Recompile, refresh and test your changes. You can use the ‘Append’ button to append the current Edit value to the previous persistent one or clear the persistent value using the ‘Clear’ button.
7. Conclusion
This article covered the basics of creating your first XAML application and adding it to Sitecore Client. Hopefully, by this point, you have already recognized some of the advantages of the new application model.
Ready for more? Read the next article in this series – “Building Publish Queue Viewer application”. That article guides you through the process of creating real-world application that uses some of the advanced controls like Calendar, Toolbar, ContextMenu, Listview and DataTreeview with DataContext. The application you create will show you the list of Items that were changed since the last publish action, effectively listing the Items which are due for publish.